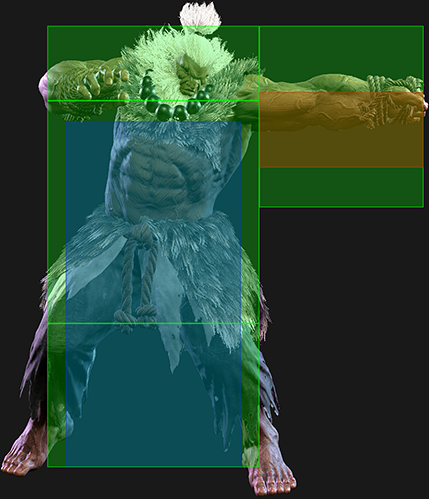
5LP
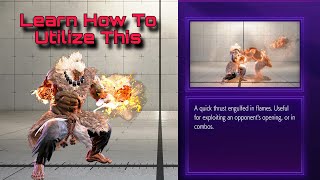
Standing Light Punch
- Startup
- 4
- Active
- 3
- Recovery
- 7
- On hit
- +4
- On block
- -1
- Damage
- 300
- Guard
- LH
- Cancel
- Chn Sp SA
- Total
- 13
- Punish counter
- +8
- Drive dmg (block)
- 500
- Drive gain
- 250
Chains into 5LP/2LP/2LK; fastest chain timing (more useful vs. DI)
Akuma has an incredibly versatile toolkit, with strong, far-reaching normals and a high walkspeed to control space, multiple projectiles to force or shield an approach, and incredible corner carry to force his foes into the most dangerous of situations. He's especially good at maintaining his advantageous positions, with certain knockdowns leading to a potentially rewarding vortex that can loop back into itself. All this is counterbalanced by his lower health, a massive drawback that makes each mistake that much more costly and forces him to use each tool in his arsenal wisely to avoid inviting his own destruction.
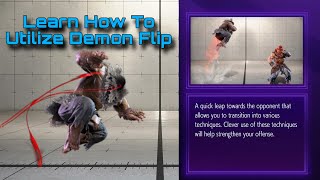
While Akuma has the traditional shoto toolkit (fireball, DP, tatsu, shoto normals), he puts his own dark spin on them, encouraging peerless aggression. His Gou Hadoken has three vastly different speeds it can be fired at, and can be charged for additional hits. His fireball also has a unique air version called Zanku Hadoken, which can be used to counter DP attempts or set up for continued pressure. His Gou Shoryuken acts as a great combo ender and anti-air, with an OD version that leaves opponents close on hit. His Tatsumaki Zanku-kyaku goes through fireballs like Ryu's, but the heavy version goes into the air, allowing him to cruelly punish bad jumpins. What really sets Akuma apart from the other shotos is his signature Demon Raid. Upon pressing this special, Akuma leaps into the air and can perform a series of followups. He has an overhead, a low, and a divekick, and each option can leave Akuma plus. If opponents try to parry through the followups, Akuma can always call this out by landing and throwing them for a Punish Counter Throw. Demon Raid is an incredible special for allowing Akuma to get his gameplan started, and the OD version even allows Akuma to throw a fireball and counter attempts to stuff his approach. While Demon Raid is strong, it can be easily anti-aired on reaction, requiring Akuma to be very considerate with where he unleashes it.
In the neutral, Akuma leverages his shoto normals of 2MK, 5HP and 5LP/5LK to control space. His fast walkspeed and strong pokes give him a dominating neutral presence. He also has some strong command normals for counterpoking, including the powerful 6MK snap kick and 6HP lunging punch. Once he's gotten you in the corner, Akuma excels at a diverse and threatening offense. He has many ways to be plus, including his 5MP and 5HK, though the latter can be ducked and punished. Akuma can use his new Adamant Flame special to set up shimmys and crush your opponent's Drive Gauge. Successful hits can be brutally effective, as Akuma's combo game is very strong with excellent juggle points OD special extensions. His devastating Empyrean's End Level 2 super leads to combo extensions, and his Level 3 is easy to combo into, allowing him to pile on the damage. On top of all of this, Akuma also has an alternate CA called Shun Goku Satsu, a 0f comboable command grab that deals incredible damage when it connects. Truly, Akuma is the master of violence.
Akuma's low vitality is a genuine concern in this game, as he has 9000 health compared to the standard 10,000. This might not seem like a lot, but it is a noticeable con, as Akuma can be two-touched by most of the cast. While opponents may fear his rewarding and dominating offense, Akuma carries much risk in basic play. Opponents who find an opening or make a specific read can punish Akuma harder than anyone else in the cast, especially if they have a Level 3 charged up. Akuma lives and dies by the mastery of the person playing him. If you can pilot him well, he will reward your efforts tenfold. If you like offense-oriented characters and can stay calm on the razor's edge, then embrace the demon with Akuma.
Godly Neutral: Great midrange pokes, outstanding fireball(s), and crazy surprise approach tools
Beastly Pressure: Strong pressure options, with many ways to be plus
Demonic Toolkit: A diverse but still accessible kit, with good options for every situation
Titan's Strength: Consistently high damage, especially in the corner
Devil's Bargain: Losing 1000 health for this insane toolkit
Chains into 5LP/2LP/2LK; fastest chain timing (more useful vs. DI)
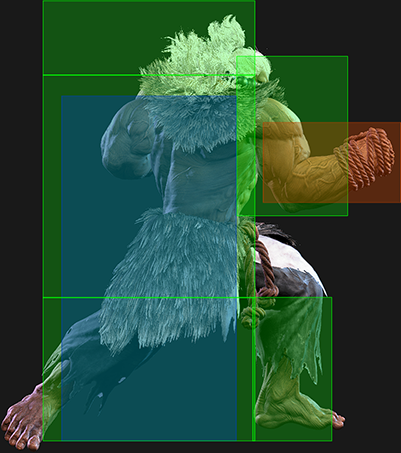
2f extra recovery on whiff; primary tool for block pressure (high active frame count makes it strong for oki); leads into much stronger combos on counter-hit

Important combo/hitconfirm tool; always a true blockstring from 5MP

Long-range hitconfirmable poke with a great hitbox; special/DR/DI cancel is delayed until after 3rd active frame
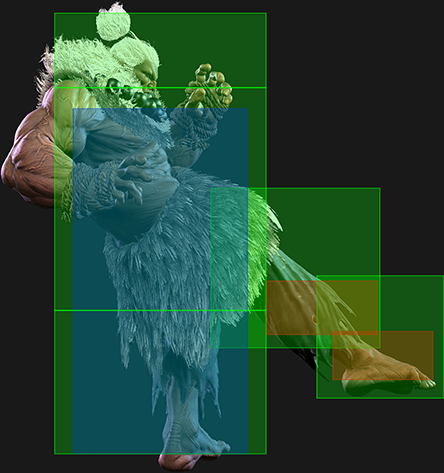
Good range for a light normal; useful in light confirms, punishes, and neutral buffers; DR cancel is delayed until after active frames

Forces stand (important for 214LK in combos and whiff punishes); high active frame count and good hitbox for counterpoking and for meaty pressure; only 15f to hitconfirm TC cancel without CH/PC/DR

Safe overhead Target Combo that's great for chipping Drive gauge; puts airborne opponents into limited juggle OTG state (can be used in juggles where 5MK connects, like wallsplat or DR~5MK routes); interruptible 5f gap between hits on block (up to 8f at max delay); will not combo on final 2 cancelable frames of 5MK without CH/PC/DR starter making it very difficult to hitconfirm

2 hits; 1st hit forces stand (important for combos); both the 2nd hit and the farthest-reaching hitbox of 1st hit whiff on crouching opponents unless they extend a vertical hurtbox; if 1st hit is stand blocked, both hits will connect on block; 1f extra recovery when 2nd hit whiffs; Counter-hit/Punish Counter advantage carries through both hits; great punish starter since scaling doesn't apply; both hits put airborne opponents into limited juggle state
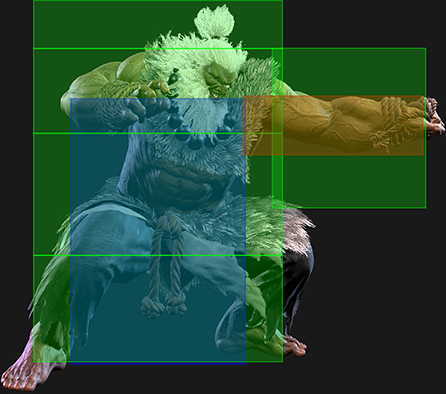
Chains into 5LP/2LP/2LK; Akuma's best light normal for combos due to 5LK link and 5MK counter-hit link; DR cancel is delayed until after active frames; topmost hurtbox on frames 1-5 is vulnerable only to aerial strikes (preventing its use as an anti-air)

2f extra recovery on whiff; excellent button for combos, midscreen buffers, and Drive Rush pressure (more rewarding than 5MP); topmost hurtbox on frames 1-8 is vulnerable only to aerial strikes (preventing its use as an anti-air); extends a wider hurtbox until the end of recovery

Forces stand (important combo/punish tool for 214LK); head/arm hurtbox is anti-air invuln while active on frames 8-15; good anti-air for vertical approaches but cannot hit cross-up (anti-air hitbox takes ~11f to come out, making it slower than average); only cancelable on active frames 1-3 with 1f extra hitstun on these frames

Chains into 5LP/2LP/2LK

Extends a wide hurtbox 3f before startup and during recovery; special/DR cancel is delayed until after active frames; DI cancel can occur on 1st active frame

6f extra recovery on block; good range and hitbox priority; has some juggle potential (no Hard Knockdown when juggled into); KD +37 when juggled into (like after 214LK); on block, always plays out a fixed 29f recovery (cannot be made safer with meaty timing)

2-hits; fast overhead with excellent reward (5MK) when used out of Drive Rush; if blocked, Akuma is out of throw range (can frame trap with CH 2LP into 5MK to punish reversal 4f jabs); 2nd hit is no longer an overhead if the first hit connects

Solid poke with easy hitconfirm timing; TC follow-up is always a true blockstring even at max delay; more damaging than 5HK when used mid-combo due to lack of damage scaling; useful out of Drive Rush for long-range oki (e.g. after midscreen throw); strong whiff punish tool that can link to 2HP at close range or 2MK from nearly any range; extends a wider hurtbox until the end of recovery

3f extra recovery on block; always a true blockstring even at max delay; puts opponent into limited juggle state; can finish with HK ender midscreen or 623MP in the corner; stronger extensions possible on a higher juggle (like Wallsplat into 2HK or any Super); easily hitconfirmable combo extension

() refers to scaled damage after 6HP~6HP combo starter; always a true blockstring even at max delay; puts opponent into limited juggle state; useful midscreen ender (623MP is stronger after a corner 6HP~6HP launch)
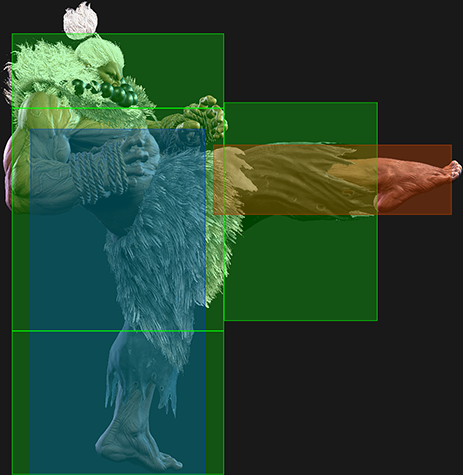
3f extra recovery on block, 4f extra recovery on whiff; whiffed version extends a wider hurtbox during recovery; long-range poke with great hitbox priority; good whiff punish tool that allows a link to 2HK from closer ranges, or into SA2 from around Akuma's 2MK range; safe from all reversal 4f normal even at point blank (except Zangief 2LK, which gets no follow-up)
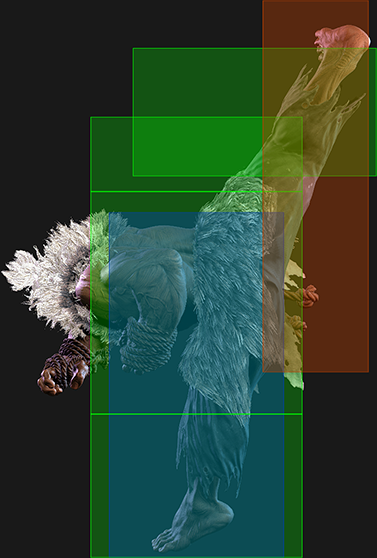
Puts opponents into limited juggle state (free juggle if used out of Drive Rush); upper body and kicking leg is anti-air invuln while active (frames 12-16); unreliable anti-air due to slow startup and extended vertical hurtbox before the invuln starts; being a cancelable launcher allows Akuma to juggle into Demon Raid follow-ups or charged fireballs
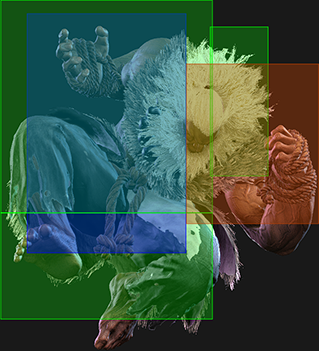
Fast air-to-air; can be used as a fuzzy instant overhead

Puts airborne opponents into limited juggle state but no juggle potential on its own; lenient cancel window to juggle into j.214K/j.236P/Air SA1; lower body projectile invuln 8-23f (cannot be used to avoid the 2nd hit of JP's OD Amnesia bombs)

Spike knockdown vs. airborne opponents on Counter-hit/Punish Counter; good hitbox priority for air approaches; lower body projectile invuln 9-23f except around attack hitbox (cannot be used to avoid the 2nd hit of JP's OD Amnesia bombs)
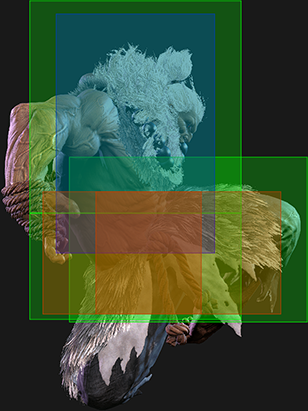
Cross-up
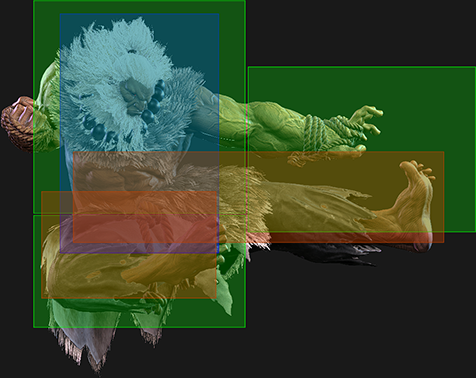
Cross-up; lower body projectile invuln 7-20f (if used immediately on the way up, can avoid the 2nd hit of JP's OD Amnesia bombs)

Most horizontal range of Akuma's air normals; lower body projectile invuln 12-19f except around attack hitbox (cannot be used to avoid the 2nd hit of JP's OD Amnesia bombs)
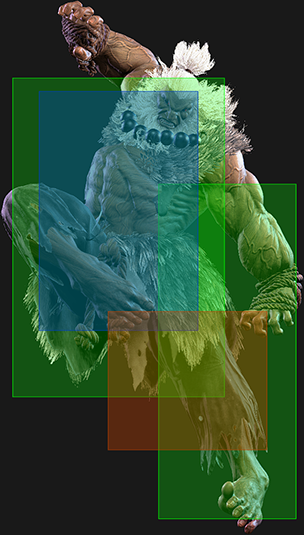
Forward Jump only; 6f extra landing recovery on whiff; great tool for mixing up jump timings, especially against characters that rely on non-invincible anti-airs; much stronger hurtbox compared to other divekicks; cannot hit cross-up; all landing recovery after the first 2 frames has a crouch-sized hurtbox, and the final recovery frame is in a crouching state; kicking leg is projectile invuln on frame 14 until landing
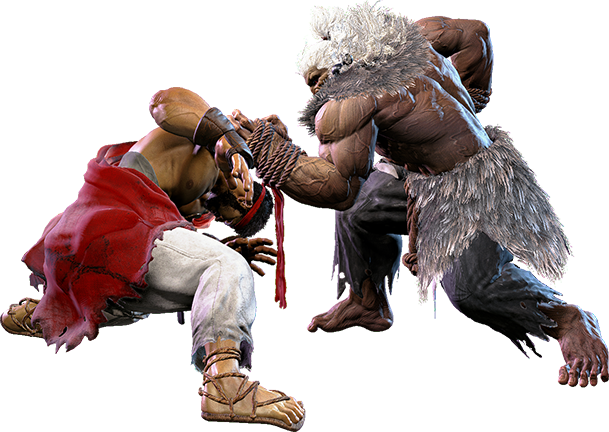
Side switches; can walk for pseudo-throw loop after throwing opponent into corner (loses to reversal 4f normals); can use immediate DR~5MP for stronger oki (but loses to invincible reversals on reaction); immediate 6HP hits meaty, becoming +6/-1 with a link to 2MP on hit or 2HP on Counter-hit; a successful Throw Escape builds 0.5 Drive bars for the defender; Throw Escape is awarded to a random player if input simultaneously

Can walk or Dash + walk for manually-timed corner throw loop; immediate TK OD Air Fireball can stuff some wakeup reversals and leave Akuma plus on block; midscreen, cannot get strike/throw mixup but can Drive Rush into delayed 6HP to beat wakeup 4f normals (+1 oB); a successful Throw Escape builds 0.5 Drive bars for the defender; Throw Escape is awarded to a random player if input simultaneously

6f extra recovery on block/whiff; can hit crouching opponents; upward angle, primarily used as a juggle ender for damage and corner carry
2f extra recovery on whiff; extra advantage on Punish Counter (+12) makes it a strong shimmy tool; 6P follow-up is a true blockstring even at max delay; can be spaced in neutral for +1f better advantage (very precise); foot hurtbox is pulled back on frames 6-18 (can make low attacks whiff); has more pushback on block vs. Burnout
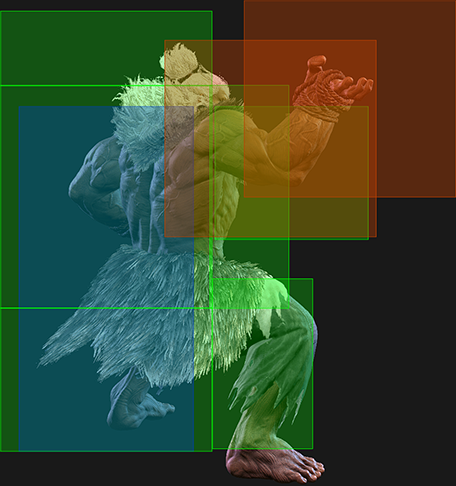
Cannot come out on whiff; true blockstring from 214HP even at max delay; puts opponents into limited juggle state with follow-up juggles possible in the corner

Crouching opponents can only be hit by active frame 4 on the 1st hit (prevents it from comboing naturally from light normals vs. crouching); () refers to disadvantage when crouching on Block or Perfect Parry; if 1st hit is stand blocked, opponent can crouch block after 2nd hit resulting in -29 on Block; cannot hit cross-up; puts opponent into limited juggle state (combos into 623LP/MP/PP); performs final kick on hit only

6f extra recovery on block/whiff; whiffs on crouching opponents (for consistency, cancel from 5MK or 2HP); cannot hit cross-up; puts opponent into limited juggle state; allows juggle into 623P (close range), 2HK (safe jump setup), or any Super

6P follow-up is a true blockstring even at max delay; can be spaced in neutral for +1f better advantage (very precise); foot hurtbox is pulled back on frames 6-12 (can make low attacks whiff); only version of 214P that can combo from 2LP/5LK
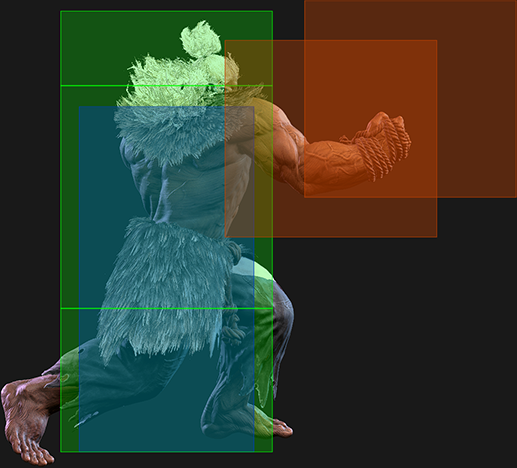
4f extra recovery on block; cannot come out on whiff; true blockstring from 214LP even at max delay; keeps opponent grounded for strike/throw mixup (requires microwalk if midscreen)
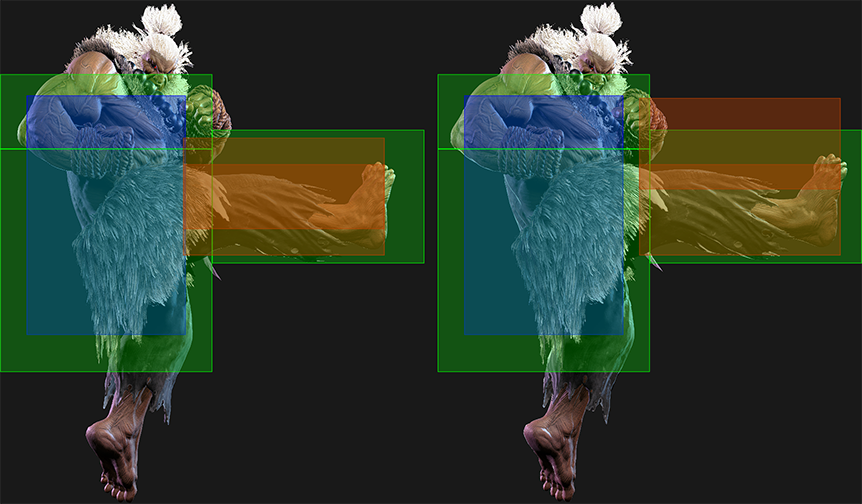
2 hits; whiffs on crouching opponents; cannot hit cross-up; puts opponent into limited juggle state (follow-up requires higher juggle connect, like after wallsplat); 2nd hit has 3f worse KD advantage; -28 oB refers to fuzzy guard scenario where 1st hit can connect vs. crouch block
3f extra recovery on whiff; extra advantage on Punish Counter (+10) makes it a strong shimmy tool; 6P follow-up is a true blockstring even at max delay; can be spaced in neutral for +1f better advantage (very precise); foot hurtbox is pulled back on frames 6-15 (can make low attacks whiff)

Cannot come out on whiff; true blockstring from 214MP even at max delay; puts opponents into limited juggle state
Can be spaced in neutral for +2f better advantage (very precise); grounded Punish Counter crumple is +16 before opponent becomes airborne; foot hurtbox is pulled back on frames 6-14 (can make low attacks whiff); combos from Punish Counter 5LK/2LP; 2f slower startup when canceled from 2MK to prevent it from comboing naturally
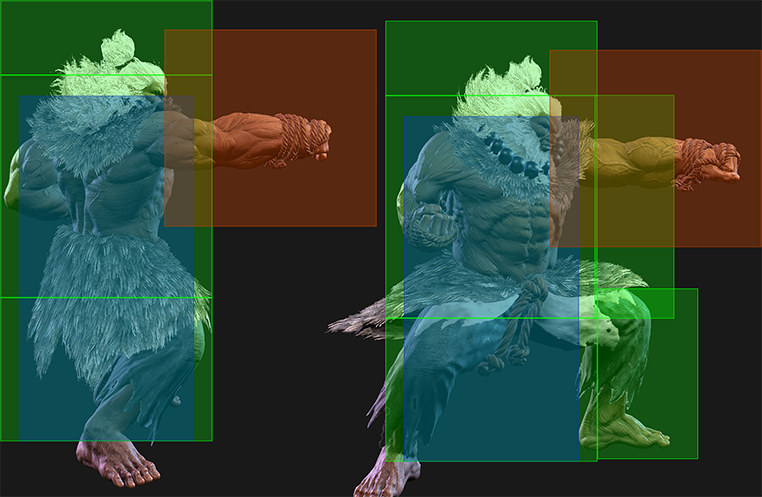
() refers to scaled damage from 214PP combo starter; 6f extra recovery on block; cannot come out on whiff; true blockstring from 214PP even at max delay; sends opponent to the edge of the screen for a wallsplat unless SA2 wallsplat occurred earlier in the combo (much less KD advantage, around +26~33); grounded wallsplat puts opponent into free juggle state (limited juggle state vs. airborne); allows a follow-up juggle if near the corner; KD advantage varies significantly depending on distance from corner
1-hit projectile; fastest movement speed and startup but slowest recovery; can hold button to charge fireball to a higher level for more hits (25f for Lv.2, 49f for Lv.3); puts airborne opponents into limited juggle state; slight hurtbox extension on legs from frame 12~ and on arms (projectile invuln) from frame 14~

Button strength determines trajectory (LK short, MK mid, HK far); counter-hit state for entire duration; cancelable into follow-ups on frames 18-40; on frame 41, automatically transitions to Demon Low Slash (or Demon Swoop if holding Down)
Tracks opponent's location regardless of distance; counter-hit state for entire duration; cancelable into follow-ups on frames 16-40 (16-38 for Fireball/Tatsu and Air SA1 follow-ups); on frame 41, automatically transitions to Demon Low Slash (or Demon Swoop if holding Down)
Acts like an empty jump (with the same 45f duration) that puts Akuma point blank; 5f extra landing recovery when crossing over opponent; useful for baiting opponent's Drive Impact or Parry; must be inputting any Down direction on frame 41 of 236KK; cannot block during landing recovery, and Akuma is in a counter-hit state for entire duration; crouching state on final recovery frame

Can be input on frame 16-38 of 236KK (unless Gou Hadoken is on-screen); does not consume additional Drive gauge; cannot hit cross-up or against grounded opponents; stops Akuma's air momentum; performs final kick on hit only, which slams opponent down into a limited juggle OTG state; KD advantage depends on how high it connects (useful after 4HK launch, allowing most juggle enders to combo); Akuma is in a crouching state on frames 4-10 of landing recovery; lower foot/leg hurtbox is projectile invuln 1f~land

3-hit OD projectile; can be input on frame 16-38 of 236KK (unless Gou Hadoken is on-screen); does not consume additional Drive gauge; dissipates if Akuma is hit; creates stationary projectile on frames 6-20, then shoots downward at ~50 degree angle (this projectile will only have 2 hits if the initial hitbox collided with opponent); on hit only, landing recovery after 2f is cancelable into any action except walking/jumping; projectile hitbox is considered an airborne attack (can be avoided with anti-air invuln moves); puts airborne opponents into free juggle state (or maintains existing juggle state); puts grounded opponents into limited juggle state; advantage varies significantly depending on timing/spacing/angle; foot hurtbox is projectile invuln 1f~land
5f extra recovery on whiff; button strength determines angle (LK short, MK mid, HK far); puts airborne opponents into limited juggle state (or maintains juggle state if used mid-combo); extends a large projectile invincible hurtbox on frame 11 until landing (making the divekick easier to anti-air while still being useful for avoiding fireballs)
4f extra recovery on whiff; recovery is in a crouching state until the final frame (final 5f on whiff); causes Akuma to auto-correct if Demon Raid crosses up
Overhead with many active frames, making it good for meaty pressure; strong hitbox and mid-air pause makes it more difficult to anti-air; cannot hit cross-up; frames 4-8 of landing recovery have a crouch-sized hurtbox (but still standing)

Acts like an empty jump (with the same 45f duration) with adjustable distance; 5f extra landing recovery when crossing over opponent; useful for baiting opponent's anti-air, Drive Impact, or Parry; must be inputting any Down direction on frame 41 of 236K; cannot block during landing recovery, and Akuma is in a counter-hit state for entire duration; crouching state on final recovery frame

5f extra recovery on whiff; button strength determines angle (LK short, MK mid, HK far); puts airborne opponents into limited juggle state (or maintains juggle state if used mid-combo); extends a large projectile invincible hurtbox on frame 11 until landing (making the divekick easier to anti-air while still being useful for avoiding fireballs)

4f extra recovery on whiff; recovery is in a crouching state until the final frame (final 5f on whiff); causes Akuma to auto-correct if Demon Raid crosses up; can be spaced for better frame advantage

Overhead with many active frames, making it good for meaty pressure; strong hitbox and mid-air pause makes it more difficult to anti-air; cannot hit cross-up; frames 4-8 of landing recovery have a crouch-sized hurtbox (but still standing)
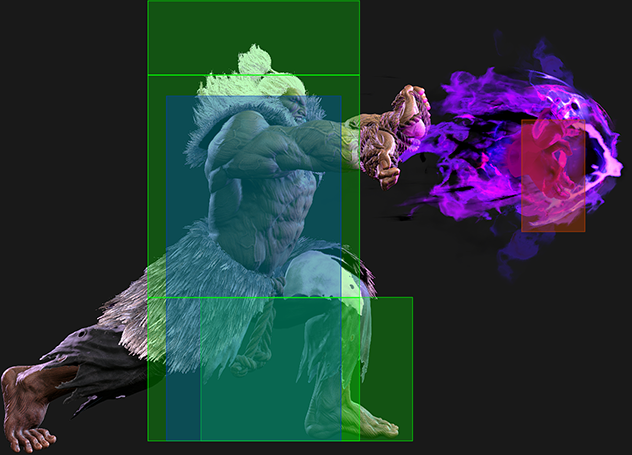
1-hit projectile; slowest movement speed and startup but fastest recovery; can hold button to charge fireball to a higher level for more hits (25f for Lv.2, 49f for Lv.3); puts airborne opponents into limited juggle state; slight hurtbox extension on legs from frame 16~ and on arms (projectile invuln) from frame 18~
1-hit projectile; middle ground for startup, movement speed, and recovery; can hold button to charge fireball to a higher level for more hits (25f for Lv.2, 49f for Lv.3); puts airborne opponents into limited juggle state; slight hurtbox extension on legs from frame 14~ and on arms (projectile invuln) from frame 16~

2-hit OD projectile; holding buttons for 24f gives the fully charged 3-hit version; holding button 9-23f extends the startup while still giving uncharged version; projectile hitbox comes out 4f after button release; puts airborne opponents into limited juggle state; slight hurtbox extension on legs from frame 12~ and on arms (projectile invuln) from frame 16~

4-hit OD projectile; 5f extra recovery if projectile does not make contact within the first 21 active frames; buttons must be held 24f to perform full charge; puts opponents into limited juggle state; Akuma can dash forward on block for a +2 strike/throw mixup; extended arm hurtbox is projectile invuln while charging; has an extended leg hurtbox on frames 10~

4-hit projectile; 5f extra recovery if projectile does not make contact within the first 21 active frames; projectile speed depends on button strength; button must be held 49f to perform full charge; puts opponents into limited juggle state; Akuma can dash forward on block for a +2 strike/throw mixup; extended arm hurtbox is projectile invuln while charging; has an extended leg hurtbox on frames 13~
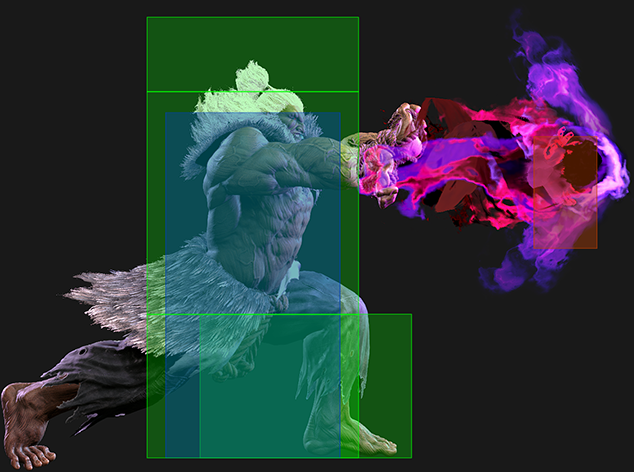
2-hit projectile; projectile speed depends on button strength; button must be held at least 25f and up to 48f for Lv.2 version (total startup 31~54f); projectile hitbox comes out 6f after button release; puts opponents into limited juggle state; useful in certain combo/juggle routes and for zoning; extended arm hurtbox is projectile invuln while charging; has an extended leg hurtbox on frames 13~
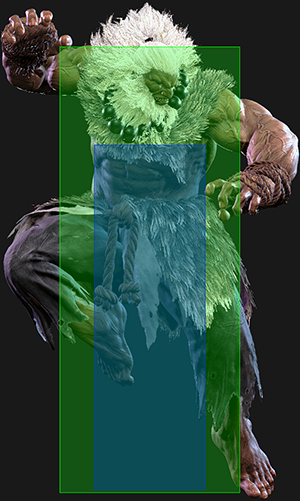
Cannot be canceled into; travels back ~1/2 screen; no collision box on frames 15-37; no invincibility whatsoever; counter-hit state for entire duration; Distance: 2.128
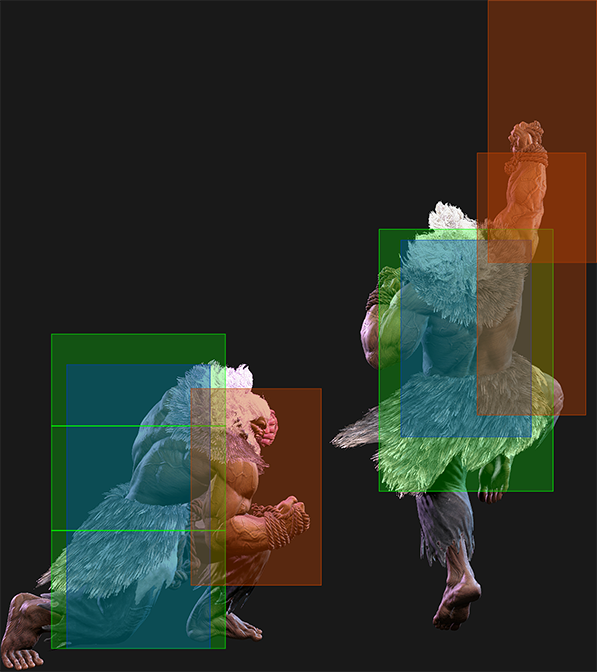
Puts opponent into limited juggle state; 3f worse on block and 100 less chip damage vs. crouching; cannot hit cross-up; only the first active frame can cancel into SA3; higher juggle limit on active frame 7~
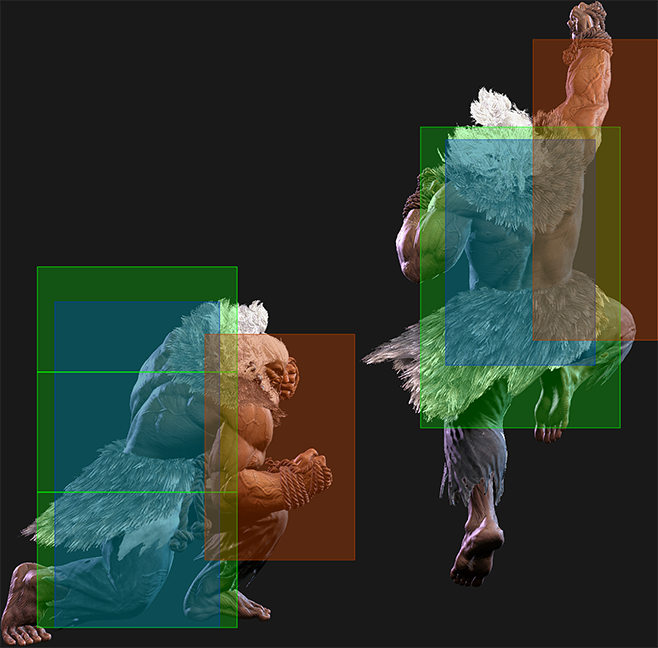
Puts opponent into limited juggle state; 300 less damage and higher juggle limit on active frames 4-10; cannot hit cross-up; only the first active frame can cancel into SA3
Puts opponent into limited juggle state; cannot hit cross-up; only the first active frame can cancel into SA3

Can only hit twice vs. grounded opponents (will not break DI armor); cannot hit cross-up; transitions to follow-up slam on hit if either of the first 2 hits connect (active frames 1-4); if only 3rd hit connects, does not perform the slam and does only 300 damage; recovery/total refers to whiff/block version
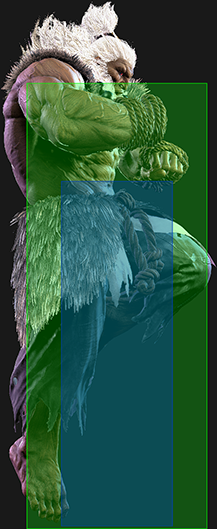
Cannot be canceled into; no collision box on frames 17-35 (can pass through opponent); no invincibility whatsoever, but passing through opponent may cause attack hitbox to whiff; counter-hit state for entire duration; frames 24-38 are cancelable into Oboro Throw follow-up; Distance: 3.663
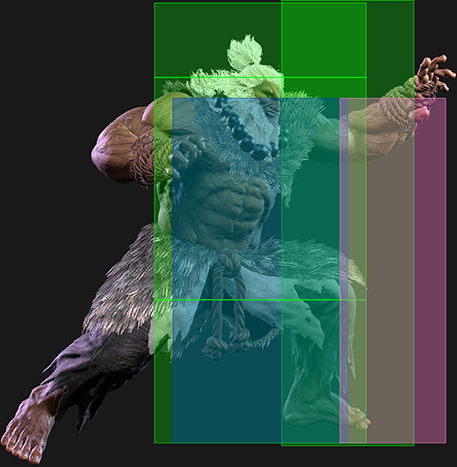
Total startup 29-45f depending on input timing; can be activated even after passing through opponent; 1.076 Range does not including 6KKK travel distance (maximum total range of 3.697)

During forward jump only; can hit cross-up but does not hit overhead; puts opponent into limited juggle state; KD and block advantage depends on how high it connects; 4f less blockstun on cross-up version; Akuma is in a crouching state on frames 4-16 of landing recovery; lower foot/leg hurtbox is projectile invuln 1f~land
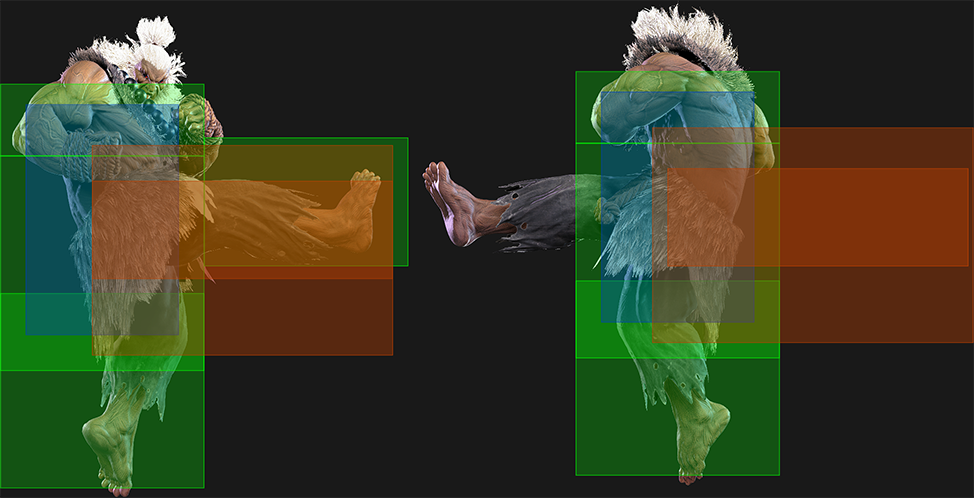
During forward jump only; cannot hit cross-up or against grounded opponents; stops Akuma's jump momentum; performs final kick on hit only, which slams opponent down into a limited juggle OTG state (combos into 623LP/MP/PP on lower connect, but more lenient after high connect like j.MP > j.214KK); KD advantage depends on how high it connects; Akuma is in a crouching state on frames 4-16 of landing recovery; lower foot/leg hurtbox is projectile invuln 1f~land
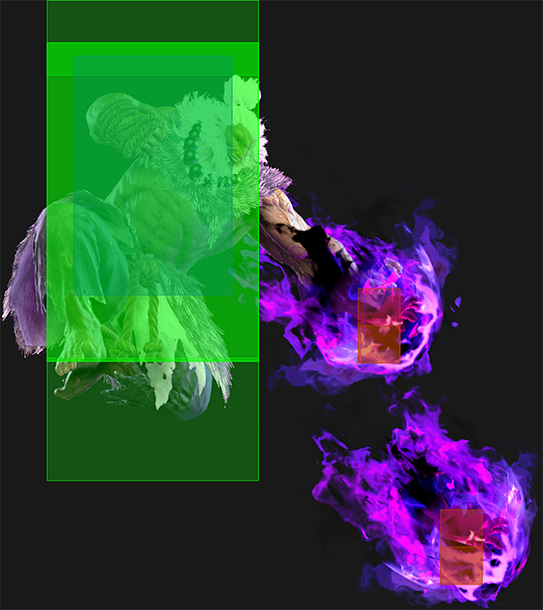
Shin Akuma only (Back Taunt~Down Taunt); forward Jump only on airborne frame 9-33; throws 2 consecutive 1-hit fireballs (2nd fireball travels faster and farther); dissipates if Akuma is hit; fireballs travel downward at ~45 degree angle; on hit only, landing recovery after 2f is cancelable into any action except walking/jumping; projectile hitbox is considered an airborne attack (can be avoided with anti-air invuln moves); puts airborne opponents into free juggle state (or maintains existing juggle state); advantage varies significantly depending on timing/spacing/angle (at worst, approximately +5 oB vs. tall characters, +7 oB vs. standard characters, and unsafe on Perfect Parry; always enough hit advantage to link); foot hurtbox is projectile invuln 1f~land; upper half of hitbox only connects on opponents mid-combo

Forward Jump only on airborne frame 9-33; 1-hit projectile; dissipates if Akuma is hit; button strength determines fireball trajectory (LP ~35 degrees / MP ~45 degrees, HP ~50 degrees); on hit only, landing recovery after 2f is cancelable into any action except walking/jumping; projectile hitbox is considered an airborne attack (can be avoided with anti-air invuln moves); puts airborne opponents into free juggle state (or maintains existing juggle state); advantage varies significantly depending on timing/spacing/angle (at worst, approximately -5 oB vs. tall characters, -3 oB vs. standard characters, and unsafe on Perfect Parry; always enough hit advantage to link); foot hurtbox is projectile invuln 1f~land; upper half of hitbox only connects on opponents mid-combo
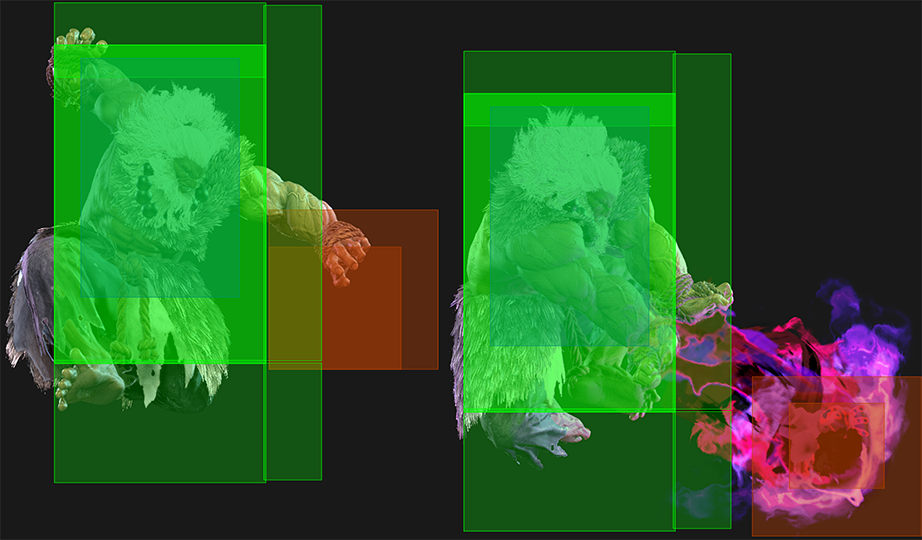
Forward/Neutral Jump only on airborne frame 9-33; 3-hit OD projectile; dissipates if Akuma is hit; creates stationary projectile on frames 6-20, then shoots downward at ~50 degree angle (this projectile will only have 2 hits if the initial hitbox collided with opponent); on hit only, landing recovery after 2f is cancelable into any action except walking/jumping; projectile hitbox is considered an airborne attack (can be avoided with anti-air invuln moves); puts airborne opponents into free juggle state (or maintains existing juggle state); puts grounded opponents into limited juggle state; advantage varies significantly depending on timing/spacing/angle (at worst, approximately -3 oB vs. tall characters, -1 oB vs. standard characters, but +1~3 if all hits Perfect Parried); foot hurtbox is projectile invuln 1f~land; upper half of hitbox only connects on opponents mid-combo

Shin Akuma only (Back Taunt~Down Taunt); teleports above opponent from anywhere on screen; 3f less recovery on whiff or Perfect Parry; startup is functionally 9f on grounded opponents (10f vs. standard-height crouchers); much less KD advantage and 2f more recovery vs. airborne opponents; cannot be canceled into from OD specials like other Level 2 Supers; cannot be beaten with anti-air invincibility since Akuma is fully invuln and technically never goes airborne
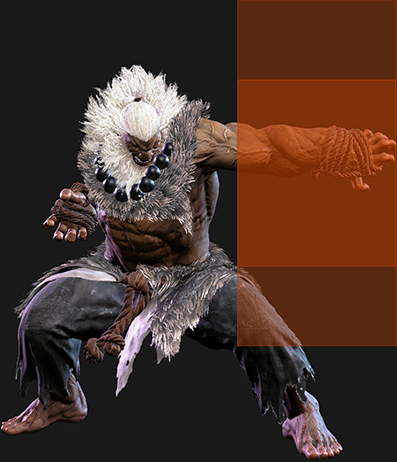
Sends the opponent tumbling ~1/3 screen; causes wallsplat near corner (unless 214PP~6P wallsplat occurred earlier in the combo); the cinematic resets the opponent's juggle counter, allowing a follow-up wallsplat juggle regardless of previous juggle state; wallsplat is similar to Drive Impact, allowing moves to juggle that normally would not be possible; close-range opponent cannot jump away after the Super freeze to avoid chip damage

Shin Akuma only (Back Taunt~Down Taunt); 9-hit Super projectile with a massive vertical hitbox; cannot be canceled into from OD specials like other Level 2 Supers; puts opponent into limited juggle state (but very difficult to launch high enough for a follow-up)
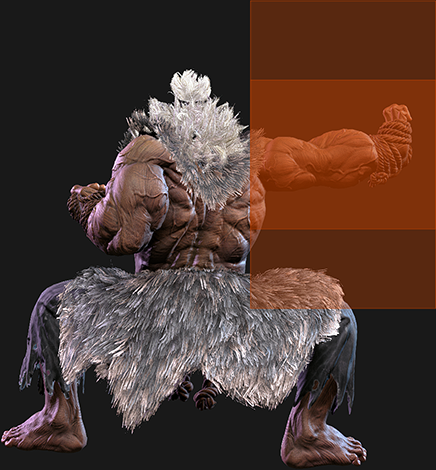
Cinematic time regenerates ~1.9 Drive bars for Akuma; close-range opponent cannot jump away after the Super freeze to avoid chip damage; only 2f startup when canceled from 623P/214P/214P~6P; leaves opponent in range for microwalk 6HP pressure or Drive Rush oki
Available at 25% HP or below; cinematic time regenerates ~2.3 Drive bars for Akuma; close-range opponent cannot jump away after the Super freeze to avoid chip damage; only 2f startup when canceled from 623P/214P/214P~6P; leaves opponent in range for microwalk 6HP pressure or Drive Rush oki

5-hit Super projectile; projectile speed is not affected by button strength; can be used while OD projectiles are on-screen; slower startup allows opponents (except Dhalsim/Lily/Zangief) to avoid with a jump after the screen freeze

5-hit Super projectile; during Forward or Neutral Jump only; 10f extra landing recovery on block/whiff; KD advantage varies significantly depending on angle and distance from opponent; puts airborne opponents into limited juggle state; travels down at ~45 degree angle; projectile speed/angle is not affected by button strength; projectile hitbox is considered an airborne attack (can be avoided with anti-air invuln moves); dissipates if Akuma is hit; can be used while OD projectiles are on-screen; leg hurtbox is projectile invuln until landing; crouching state on final recovery frame

Available at 25% HP or below; cinematic time regenerates ~2.3 Drive bars for Akuma; command grab that can be comboed into on grounded opponents; entire startup happens before the Super freeze, making the grab inescapable if the opponent is within throw range; very short range makes it unable to punish most -6 attacks; Range does not include travel distance (max total distance 2.927); generally impractical as a fireball counter due to the slow travel speed and input requirement (unless opponent has a much slower fireball recovery, or a chargeable fireball that can easily be reacted to)

Performed by inputting 6HPHK during blockstun; 5f extra recovery on hit; freezes the screen for 4f during startup; see Drive Reversal.
Performed by holding 6HPHK on wakeup; 5f extra recovery on hit; does not have any screen freeze except for a 12f freeze when interacting with the opponent's throw hitbox (this also refunds 1 Drive bar after punishing the throw); see Drive Reversal.
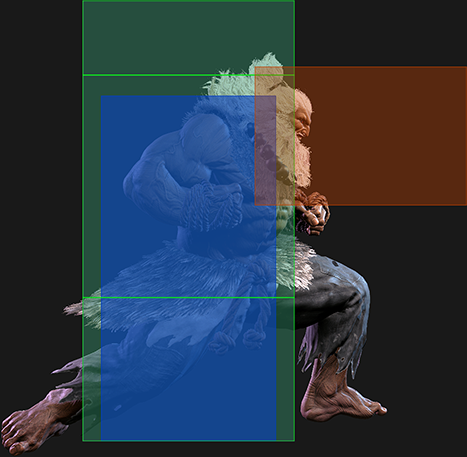
See Drive Impact. Airborne connect gives spinning juggle state on Punish Counter or corner Wall Splat with variable height.

See Drive Parry. Perfect Parrying has only 1F of recovery and disables the opponent from canceling their attack. Perfect Parrying projectiles puts you into fixed 11 frames of recovery. After a Perfect Parry, all Super Gauge gain is reduced by 20% and Drive Gauge gain/damage is reduced by 50% for the entire punish combo.
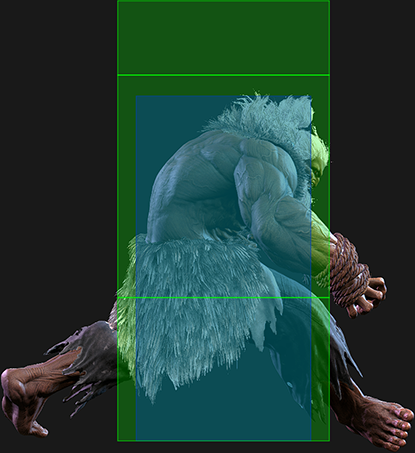
See Drive Rush; 3-bar version performed on hit/block from a cancelable normal; can also be performed on whiff from cancelable light normals; startup refers to minimum time before an attack can cancel the Drive Rush animation; the first 15 recovery frames are cancelable into any attack; the final 22 recovery frames are cancelable into any attack or movement option or blocking (except Parry); only Normal and Command Normal attacks are enhanced with +4 frame advantage and improved juggle properties
See Drive Rush; 1-bar version performed out of a Parry; startup refers to minimum time before an attack can cancel the Drive Rush animation (if performed immediately after a successful Parry, only 1+8 startup); the first 15 recovery frames are cancelable into any attack; the final 22 recovery frames are cancelable into any attack or movement option or blocking (except Parry); only Normal and Command Normal attacks are enhanced with +4 frame advantage and improved juggle properties; Distance: 0.880 (min/throw), 2.121 (min/block), 3.425 (max/final DR frame)

"滅 (Metsu!)"

"You have piqued my interest. Attack if you dare." "How disappointing." (if no attack); inputting a Down Taunt (2PPPKKK) on frames 592-628 causes Akuma to pull out a rice ball (gains 3 bars of Super meter and becomes Shin Akuma if fully consumed)
Inputting a Down Taunt on frames 592-628 of Back Taunt causes Akuma to pull out a rice ball; while eating, Akuma gains Super meter on each bite (1/2 bar on frames 931 and 1129, then 1 bar on frames 1353 and 1604); becomes Shin Akuma on frame 1604 (gains access to Hidden Arts: Double Zanku Hadoken, Misogi, and Kongou-Kokuretsuzan); if Akuma is hit before frame 1604, he does not become Shin Akuma
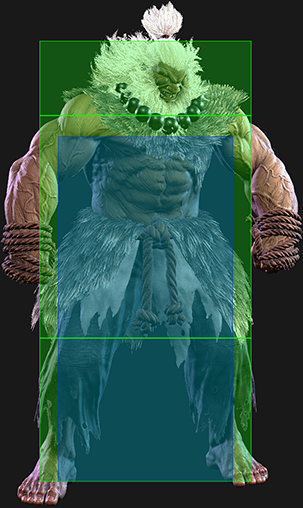
"Witness the abyss before you."
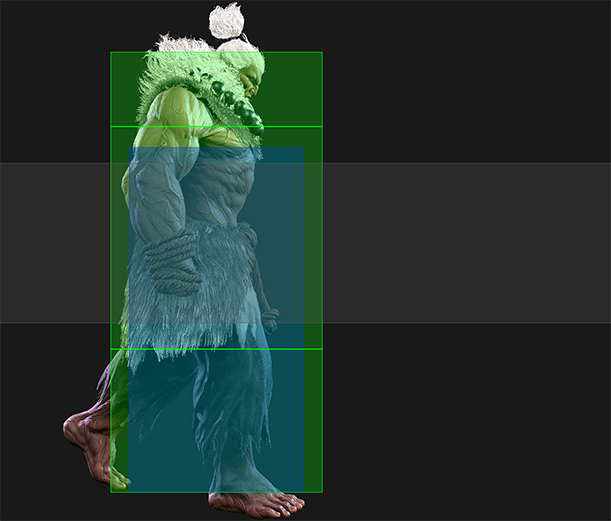
Fullscreen proximity guard box on frames 107-570 (prevents opponent from walking back); "Are you prepared to tread down this path? If you are afraid... run."; "Hmph... you are a disgrace." (after opponent switches sides, resulting in shorter taunt animation)
Character data, frame data and patch notes are mirrored from the SuperCombo wiki, maintained by the community under CC BY-SA.